Difference between revisions of "Cpp2"
(→Using API2 with Visual Studio 2010 and cmake) |
|||
| Line 29: | Line 29: | ||
: C:/Users/yourprofile/Documents/build/c++/circle | : C:/Users/yourprofile/Documents/build/c++/circle | ||
| − | Click configure. You'll be ask for the compiler you are going to use. Select Visual Studio 10 here. | + | Click configure. You'll be ask for the compiler you are going to use. Select Visual Studio 10 here. After configuration completed click Generate to generate the Visual Studio project. |
<gallery> | <gallery> | ||
Revision as of 17:18, 10 February 2012
Introduction
| The second version of the application programming interface (API2) for Robotino(r) from Festo Didactic permits full access to Robotino's sensors and actors. Communication between the control program and Robotino is handled via TCP and UDP and is therefor fully network transparent. It does not matter whether the control program runs direcly on Robotino or on a remote system.
API2 requires CF card 3.x. The Robotino Simulator currently does not support API2. |
Package links |
|---|
Using API2 with Visual Studio 2010 and cmake
- Install Visual Studio.
- Install cmake.
- If you want to build the examples with grafical user interface also install Qt4.
- Install the robotino_api2-i386 (to build 32bit applications) or robotino_api2-amd64 (to build 64bit applications) binary package.
In order to be able to modify the C++ examples shipping with the robotino_api2 package copy the folder holding the c++ examples from the installation directory to your user directory. This is a must for users of Windows Vista or later.
- C:\Program Files\REC GmbH\robotino\api2\examples\c++ -> C:\Users\yourprofile\Documents
Now use cmake (cmake-gui) to generate a Visual Studio project from the CMakeLists.txt in each example folder. Put in the correct path to the source code
- C:/Users/yourprofile/Documents/c++/circle
Select a path where to generate the Visual Studio files to
- C:/Users/yourprofile/Documents/build/c++/circle
Click configure. You'll be ask for the compiler you are going to use. Select Visual Studio 10 here. After configuration completed click Generate to generate the Visual Studio project.
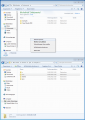
Copy examples to user directory
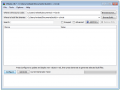
Select source and build directory
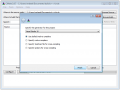
Select compiler
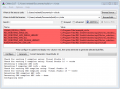
Successfull configuration


