Difference between revisions of "Robotino myRIO Toolkit"
(→Example Project & Demos) |
|||
| (6 intermediate revisions by the same user not shown) | |||
| Line 3: | Line 3: | ||
This Page deals with the different VI of the Block Diagram Palette, Front Panel Palette and some other important VI like the PI-Control of the Omnidrive. | This Page deals with the different VI of the Block Diagram Palette, Front Panel Palette and some other important VI like the PI-Control of the Omnidrive. | ||
The last section is about getting you started with your own Project with the Toolkit. | The last section is about getting you started with your own Project with the Toolkit. | ||
| + | |||
| + | Get the Source and VI package from http://doc.openrobotino.org/download/LabView/Robotino_MyRIO_Toolkit_current.php | ||
== Example Project & Demos == | == Example Project & Demos == | ||
| − | The Example Project is automatically opened after the installation of the VI package. (You can find it at ..\National Instruments\LabVIEW 2013\examples\Robotics Equipment Corporation GmbH\Robotino MyRIO Toolkit\examples\example project.lvproj) It contains | + | The Example Project is automatically opened after the installation of the VI package. (You can find it at ..\National Instruments\LabVIEW 2013\examples\Robotics Equipment Corporation GmbH\Robotino MyRIO Toolkit\examples\example project.lvproj) It contains five Demo VI to test the different functionalities of the Robotino & MyRIO Hardware. |
| − | # | + | #OmniDrive Demo: This Demo shows the functionality of the Omnidrive_set.vi |
| − | # | + | #Square Demo The Robotino follows the shape of a 1m x 1m square. |
| − | # | + | #Track Get Demo: The Track Get Demo draws a graph of a track with the help of the distance\_get.vi. |
| − | #AutonomousDriveDemo.vi: In this Demo the Robotino is capable of autonomous navigation along a wall and is able to detect and move around corners. Two IR-Sensors are used to keep the distance to the wall as to detect the star and end of a corner. This | + | #Radar Demo: The Radar Demo makes use of the IR sensors. The robot makes a turn of 40\degree over a duration of 1 second. During the rotation the distance is measured every 2 milliseconds by the IR-sensors. After the rotation a picture of those measured points is drawn. |
| + | #AutonomousDriveDemo.vi: In this Demo the Robotino is capable of autonomous navigation along a wall and is able to detect and move around corners. Two IR-Sensors are used to keep the distance to the wall as to detect the star and end of a corner. This Youtube video below shows the demonstration. | ||
| + | {{#ev:youtube|Mae0GcsShjE}} | ||
== Block Diagram VI == | == Block Diagram VI == | ||
| − | [[File:Block_palette.png|frame|right|The Block Diagram | + | [[File:Block_palette.png|frame|right|The Block Diagram VI]] |
| − | The | + | The Robotino myRIO Toolkit for Labview consist of 19 VI which are arranged in several subcategories. |
| − | === | + | ===Omnidrive_init.vi:=== |
Initializes and starts the Velocity [[#Other VI|PI-Control]] of the 3 DC-Motors of the Robotino with an asynchronous call. Additionally if the “Bumper on” input is “TRUE” the BumperCollisonDetection.vi is started which stops all 3 motor-controls upon a collision and thus any further movement. The VI has the references to the asynchronous called VI as output. | Initializes and starts the Velocity [[#Other VI|PI-Control]] of the 3 DC-Motors of the Robotino with an asynchronous call. Additionally if the “Bumper on” input is “TRUE” the BumperCollisonDetection.vi is started which stops all 3 motor-controls upon a collision and thus any further movement. The VI has the references to the asynchronous called VI as output. | ||
[[File:omnistart_vi.png|none|thumb|StartOmniDrive.vi]] | [[File:omnistart_vi.png|none|thumb|StartOmniDrive.vi]] | ||
| − | === | + | ===Omnidrive_set.vi:=== |
Set the current translational and rotational velocities of the Robotino in meter per second and revolutions per second. This VI transforms those inputs into specific rotational speeds for the three Omnidrive wheels. Those calculated values are written into the three global variables “n (M1)”,”n (M2)” and “n (M3)” which are the input values for the different Motor_PI.vi respectively. | Set the current translational and rotational velocities of the Robotino in meter per second and revolutions per second. This VI transforms those inputs into specific rotational speeds for the three Omnidrive wheels. Those calculated values are written into the three global variables “n (M1)”,”n (M2)” and “n (M3)” which are the input values for the different Motor_PI.vi respectively. | ||
[[File:OmniSet_vi.png|none|thumb|SetOmniDrive.vi]] | [[File:OmniSet_vi.png|none|thumb|SetOmniDrive.vi]] | ||
| − | === | + | ===StopOmnidrive_stop.vi:=== |
This VI stops the Motor_PI.vi then closes the references to them. This VI has the Cluster of references from the StartOmniDrive.vi as input. | This VI stops the Motor_PI.vi then closes the references to them. This VI has the Cluster of references from the StartOmniDrive.vi as input. | ||
[[File:OmniStop_vi.png|none|thumb|StopOmniDrive.vi]] | [[File:OmniStop_vi.png|none|thumb|StopOmniDrive.vi]] | ||
| Line 29: | Line 33: | ||
This VI initializes and configures the SPI-Connection with the [http://www.analog.com/media/en/technical-documentation/data-sheets/AD7490.pdf ADC (AD7490)] and then transforms the transmitted voltage values of the 9 IR-Sensors into distances in meter. Per run of this VI only one new analog input value is transmitted so that it needs 16 calls of this function for all analog inputs to be updated. | This VI initializes and configures the SPI-Connection with the [http://www.analog.com/media/en/technical-documentation/data-sheets/AD7490.pdf ADC (AD7490)] and then transforms the transmitted voltage values of the 9 IR-Sensors into distances in meter. Per run of this VI only one new analog input value is transmitted so that it needs 16 calls of this function for all analog inputs to be updated. | ||
[[File:IrDistance_vi.png|none|thumb|DistanceIR.vi]] | [[File:IrDistance_vi.png|none|thumb|DistanceIR.vi]] | ||
| − | |||
== Front Panel Controls == | == Front Panel Controls == | ||
| + | *IrSensorGrapic.ctl Shows the numeric distance values of the IR-Sensors and their location. | ||
| + | [[File:IR_ctl.png|none|thumb|Picture of the Control]] | ||
== Other VI== | == Other VI== | ||
| Line 44: | Line 49: | ||
== Creating your own VI with the Toolkit == | == Creating your own VI with the Toolkit == | ||
| + | # Open a new VI with your myRIO as the target. | ||
| + | # Create a flat sequence structure with 4 frames | ||
| + | # Now put the StartOmniDrive.vi in the first frame and the StopOmniDrive.vi in the last frame and connect them properly | ||
| + | # Put the SetOmniDrive.vi in second and third frame and the IrDistance.vi just in the second | ||
| + | # Set the Omega in the second frame with the SetOmniDrive.vi to 0.1 and back to 0 in the third frame. | ||
| + | # Go to the Front Panel add an IrSensorGraphic.ctl and connect it back in the Block Diagram with the IrDistance.vi in the second frame. | ||
| + | # Insert an Array to Cluster cast from the Array Palette in the last built connection and add an 10s Time Delay with the Time Delay Express VI to the second frame. | ||
| + | # Now you VI should look like in the picture below. Just try out what happens if you run the VI. You should add some objects around the Robotino so he can detect them. | ||
| + | [[File:Example_vi.png]] | ||
Latest revision as of 01:39, 4 May 2016
Contents
Introduction
This Page deals with the different VI of the Block Diagram Palette, Front Panel Palette and some other important VI like the PI-Control of the Omnidrive. The last section is about getting you started with your own Project with the Toolkit.
Get the Source and VI package from http://doc.openrobotino.org/download/LabView/Robotino_MyRIO_Toolkit_current.php
Example Project & Demos
The Example Project is automatically opened after the installation of the VI package. (You can find it at ..\National Instruments\LabVIEW 2013\examples\Robotics Equipment Corporation GmbH\Robotino MyRIO Toolkit\examples\example project.lvproj) It contains five Demo VI to test the different functionalities of the Robotino & MyRIO Hardware.
- OmniDrive Demo: This Demo shows the functionality of the Omnidrive_set.vi
- Square Demo The Robotino follows the shape of a 1m x 1m square.
- Track Get Demo: The Track Get Demo draws a graph of a track with the help of the distance\_get.vi.
- Radar Demo: The Radar Demo makes use of the IR sensors. The robot makes a turn of 40\degree over a duration of 1 second. During the rotation the distance is measured every 2 milliseconds by the IR-sensors. After the rotation a picture of those measured points is drawn.
- AutonomousDriveDemo.vi: In this Demo the Robotino is capable of autonomous navigation along a wall and is able to detect and move around corners. Two IR-Sensors are used to keep the distance to the wall as to detect the star and end of a corner. This Youtube video below shows the demonstration.
{{#ev:youtube|Mae0GcsShjE}}
Block Diagram VI
The Robotino myRIO Toolkit for Labview consist of 19 VI which are arranged in several subcategories.
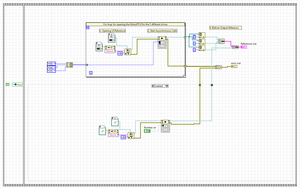
Omnidrive_init.vi:
Initializes and starts the Velocity PI-Control of the 3 DC-Motors of the Robotino with an asynchronous call. Additionally if the “Bumper on” input is “TRUE” the BumperCollisonDetection.vi is started which stops all 3 motor-controls upon a collision and thus any further movement. The VI has the references to the asynchronous called VI as output.
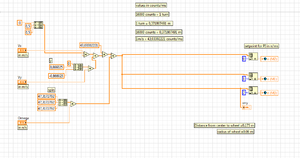
Omnidrive_set.vi:
Set the current translational and rotational velocities of the Robotino in meter per second and revolutions per second. This VI transforms those inputs into specific rotational speeds for the three Omnidrive wheels. Those calculated values are written into the three global variables “n (M1)”,”n (M2)” and “n (M3)” which are the input values for the different Motor_PI.vi respectively.
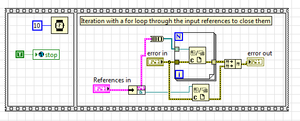
StopOmnidrive_stop.vi:
This VI stops the Motor_PI.vi then closes the references to them. This VI has the Cluster of references from the StartOmniDrive.vi as input.
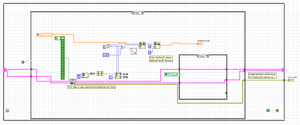
DistanceIR.vi:
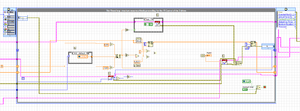
This VI initializes and configures the SPI-Connection with the ADC (AD7490) and then transforms the transmitted voltage values of the 9 IR-Sensors into distances in meter. Per run of this VI only one new analog input value is transmitted so that it needs 16 calls of this function for all analog inputs to be updated.
Front Panel Controls
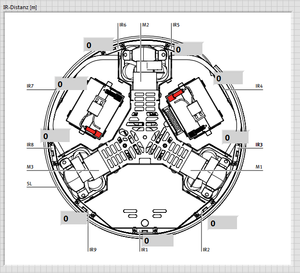
- IrSensorGrapic.ctl Shows the numeric distance values of the IR-Sensors and their location.
Other VI
Motor_PI.vi:
This VI is run for each DC-Motor in preallocated clone reentrant execution. The VI is timed on a 1 kHz frequency in a Real-Time loop. First it calculates the difference in encoder counts from the last cycle to the current circle and then it calculates the next duty-circle length of the PWM-Signal with the PI-Control. The amount of values considered for the Integral Control is limited to the last 100 values. Further this VI opens and closes all three I/O references it uses, the encoder counts, PWM-Signal and direction switch of the H-Bridge. The Motor_PI.vi can be shut down through the Motor_Stop.vi global variable.
SPI_Voltage2Distance2.vi:
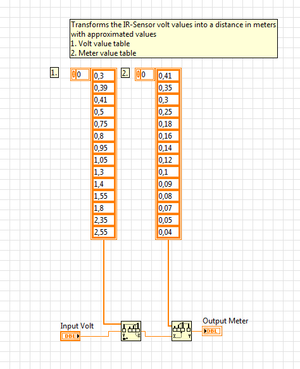
Transforms the IR-Sensor voltage as input into a distance in meters with approximated values from a table of measurements as output.
Creating your own VI with the Toolkit
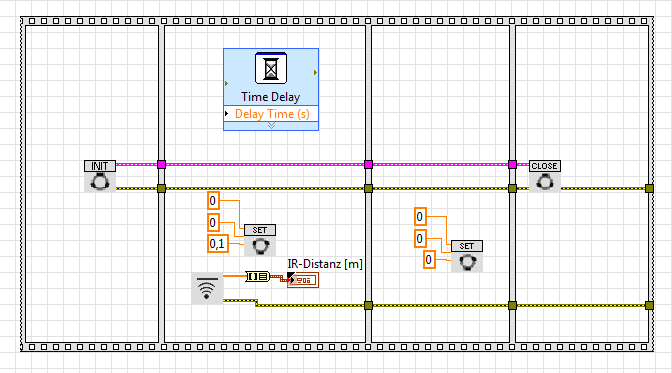
- Open a new VI with your myRIO as the target.
- Create a flat sequence structure with 4 frames
- Now put the StartOmniDrive.vi in the first frame and the StopOmniDrive.vi in the last frame and connect them properly
- Put the SetOmniDrive.vi in second and third frame and the IrDistance.vi just in the second
- Set the Omega in the second frame with the SetOmniDrive.vi to 0.1 and back to 0 in the third frame.
- Go to the Front Panel add an IrSensorGraphic.ctl and connect it back in the Block Diagram with the IrDistance.vi in the second frame.
- Insert an Array to Cluster cast from the Array Palette in the last built connection and add an 10s Time Delay with the Time Delay Express VI to the second frame.
- Now you VI should look like in the picture below. Just try out what happens if you run the VI. You should add some objects around the Robotino so he can detect them.

