Difference between revisions of "Nimh2"
| Line 1: | Line 1: | ||
<gallery> | <gallery> | ||
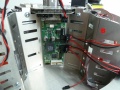
Image:Robotino3_NiMH_1.jpg|Step1: Remove control unit and handle bars | Image:Robotino3_NiMH_1.jpg|Step1: Remove control unit and handle bars | ||
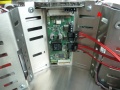
| − | Image:Robotino3_NiMH_3.jpg|Step2: Remove Pb | + | Image:Robotino3_NiMH_3.jpg|Step2: Remove Pb battery from side A |
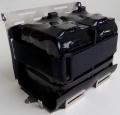
| − | Image:Robotino3_NiMH_2.jpg|Step3: Remove Pb | + | Image:Robotino3_NiMH_2.jpg|Step3: Remove Pb battery from side B |
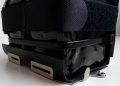
Image:Robotino3_NiMH_5.jpg|Step4: Prepare charger for side B | Image:Robotino3_NiMH_5.jpg|Step4: Prepare charger for side B | ||
Image:Robotino3_NiMH_4.jpg|Step5: Install charger on side B | Image:Robotino3_NiMH_4.jpg|Step5: Install charger on side B | ||
Image:Robotino3_NiMH_6.jpg|Step6: Install cables to charger on side A | Image:Robotino3_NiMH_6.jpg|Step6: Install cables to charger on side A | ||
| − | Image:Robotino3_NiMH_7.jpg|Rubber band to isolate | + | Image:Robotino3_NiMH_7.jpg|Rubber band to isolate battery from metal holder |
Image:Robotino3_NiMH_8.jpg|Detailed view of rubber band isolation | Image:Robotino3_NiMH_8.jpg|Detailed view of rubber band isolation | ||
| − | Image:Robotino3_NiMH_11.jpg|Detailed view of | + | Image:Robotino3_NiMH_11.jpg|Detailed view of battery holder install position |
| − | Image:Robotino3_NiMH_9.jpg|Step7: Install | + | Image:Robotino3_NiMH_9.jpg|Step7: Install battery holder with rubber band on side B |
| − | Image:Robotino3_NiMH_10.jpg|Step8: Install and connect | + | Image:Robotino3_NiMH_10.jpg|Step8: Install and connect battery on side B |
| − | Image:Robotino3_NiMH_12.jpg|Step9: Install and connect | + | Image:Robotino3_NiMH_12.jpg|Step9: Install and connect battery on side A |
</gallery> | </gallery> | ||
| Line 18: | Line 18: | ||
Robotino v3 is designed to load up to three NiMH accumulator packs. We recommend to install two NiMH accumulator packs because the installation of the third pack is quiet complicated. Also we think that the autonomous operation time of 8 hours and more with two NiMH packs is a reasonable value. | Robotino v3 is designed to load up to three NiMH accumulator packs. We recommend to install two NiMH accumulator packs because the installation of the third pack is quiet complicated. Also we think that the autonomous operation time of 8 hours and more with two NiMH packs is a reasonable value. | ||
| + | |||
| + | ==Tools needed== | ||
| + | You need a big screw driver to unfasten the screws holding the control unit. You need a 2,5mm and a 2mm hex-wrench for the rest of the screws. | ||
| + | |||
| + | ==Step 1== | ||
| + | '''Remove the fuses from the two batteries'''. Now you are safe to disassemble Robotino. | ||
| + | *Remove the control unit. | ||
| + | *Remove the caps covering the wheels. | ||
| + | *Remove the handle bars. | ||
| + | |||
| + | ==Step 2 and 3== | ||
| + | *Unfasten the hook-and-loop tape holding the Pb batteries. | ||
| + | *Remove the batteries. | ||
| + | *Remove the battery holder. | ||
| + | |||
| + | ==Step 4== | ||
| + | Prepare the additional charger for side B. Install the screws with the spacer. Install all the cables to the charger before mounting it on Robotino. | ||
| + | |||
| + | ==Step 5== | ||
| + | Mount the prepared charger on side B. Fasten the screws with the 2mm hex-wrench. | ||
Revision as of 17:37, 10 November 2015
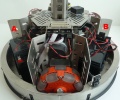
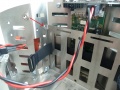
Step1: Remove control unit and handle bars
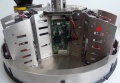
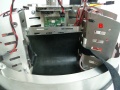
Step2: Remove Pb battery from side A
Step3: Remove Pb battery from side B
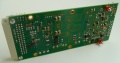
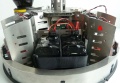
Step4: Prepare charger for side B
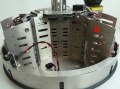
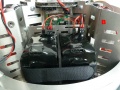
Step5: Install charger on side B
Step6: Install cables to charger on side A
Rubber band to isolate battery from metal holder
Detailed view of rubber band isolation
Detailed view of battery holder install position
Step7: Install battery holder with rubber band on side B
Step8: Install and connect battery on side B
Step9: Install and connect battery on side A


Introduction
By replacing the Pb accumulators shipping with Robotino with the NiMH accumulators the time of autonomous operation can be doubled. While the Pb accumulators have a capacity of 9.5Ah and an average voltage of about 23V the NiMH accumulators have a capacity of 18Ah at an average voltage of about 22.5V. The available energy of the Pb accumulators is therefor 218Wh and the energy of the NiMH 414Wh. Furthermore the NiMH cells show a much better performance over time, i.e. the amount of energy that can be stored by the NiMH remains almost unchanged after hundreds of charging cycles.
Robotino v3 is designed to load up to three NiMH accumulator packs. We recommend to install two NiMH accumulator packs because the installation of the third pack is quiet complicated. Also we think that the autonomous operation time of 8 hours and more with two NiMH packs is a reasonable value.
Tools needed
You need a big screw driver to unfasten the screws holding the control unit. You need a 2,5mm and a 2mm hex-wrench for the rest of the screws.
Step 1
Remove the fuses from the two batteries. Now you are safe to disassemble Robotino.
- Remove the control unit.
- Remove the caps covering the wheels.
- Remove the handle bars.
Step 2 and 3
- Unfasten the hook-and-loop tape holding the Pb batteries.
- Remove the batteries.
- Remove the battery holder.
Step 4
Prepare the additional charger for side B. Install the screws with the spacer. Install all the cables to the charger before mounting it on Robotino.
Step 5
Mount the prepared charger on side B. Fasten the screws with the 2mm hex-wrench.