Difference between revisions of "Nimh2"
From RobotinoWiki
(Created page with "<gallery> Image:Robotino3_NiMH_1.jpg|Step1: Remove control unit and handle bars </gallery>") |
|||
| Line 1: | Line 1: | ||
<gallery> | <gallery> | ||
Image:Robotino3_NiMH_1.jpg|Step1: Remove control unit and handle bars | Image:Robotino3_NiMH_1.jpg|Step1: Remove control unit and handle bars | ||
| + | Image:Robotino3_NiMH_3.jpg|Step2: Remove Pb accumulator from side A | ||
| + | Image:Robotino3_NiMH_2.jpg|Step3: Remove Pb accumulator from side B | ||
| + | Image:Robotino3_NiMH_5.jpg|Step4: Prepare charger for side B | ||
| + | Image:Robotino3_NiMH_4.jpg|Step5: Install charger on side B | ||
| + | Image:Robotino3_NiMH_6.jpg|Step6: Install cables to charger on side A | ||
| + | Image:Robotino3_NiMH_7.jpg|Rubber band to isolate accumulator from metal holder | ||
| + | Image:Robotino3_NiMH_8.jpg|Detailed view of rubber band isolation | ||
| + | Image:Robotino3_NiMH_11.jpg|Detailed view of accumulator holder install position | ||
| + | Image:Robotino3_NiMH_9.jpg|Step7: Install accumulator holder with rubber band on side B | ||
| + | Image:Robotino3_NiMH_10.jpg|Step8: Install and connect accumulator on side B | ||
| + | Image:Robotino3_NiMH_12.jpg|Step9: Install and connect accumulator on side A | ||
</gallery> | </gallery> | ||
Revision as of 12:27, 9 November 2015
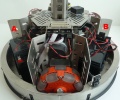
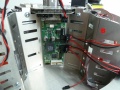
Step1: Remove control unit and handle bars
Step2: Remove Pb accumulator from side A
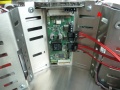
Step3: Remove Pb accumulator from side B
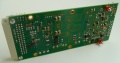
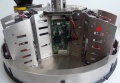
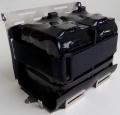
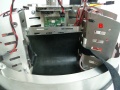
Step4: Prepare charger for side B
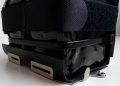
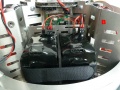
Step5: Install charger on side B
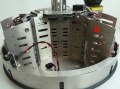
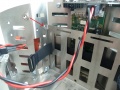
Step6: Install cables to charger on side A
Rubber band to isolate accumulator from metal holder
Detailed view of rubber band isolation
Detailed view of accumulator holder install position
Step7: Install accumulator holder with rubber band on side B
Step8: Install and connect accumulator on side B
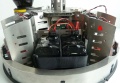
Step9: Install and connect accumulator on side A


